Showing posts with label Sinful Colors. Show all posts

Wednesday, May 9, 2018

Sinful Colors x Vanessa Hudgens Festival Collection

*press sample

Hello lovelies! I am stoked about today's post! I was so thrilled to hear from the brand Sinful Colors when they reached out to see if I'd like to review their newest collection. Sinful Colors is known for their seriously affordable prices and quality formulas. My local drugstores are never good at stocking their new shades so I jumped at the chance to get my hands on these. 

The new face of Sinful Colors (it's a full cosmetic line) is Vanessa Hudgens and they have teamed up to create this twelve piece festival inspired collection. There is a wide variety of colors and finishes, some of which I found really hard to describe but I did my best! These lived up to their reputation and all had nice to great formulas. Let's get to it..

Wednesday, April 19, 2017

Hehe Stamping Plates Review- The Science Collection


A couple weeks back I reviewed some new plus size Hehe stamping plates and as promised I am back with their Science Collection! When I saw this collection released last year I fell in love. There are so many awesome and unique images! I'm not a science nerd by any means. My hubby is the one with the Scientific American subscription, although I might pick it up to look at the pictures, lol. My point is, anyone can appreciate this collection because it is just so COOL.

Thursday, March 23, 2017

Sinful Colors Prosecco


It's rare that I post swatches of a polish on its own, but this one is special enough that it deserves the spotlight. I have seen toooons of photos of Sinful Colors Prosecco but was never able to find it in the stores/ I didn't look too hard for it. You can only chase after so many polishes at a time, right? Well I laid my hands on this recently and finally understand the obsession.

Monday, March 6, 2017

15 Gorgeous Green Nail Polishes for St. Patrick's Day


Green-tings lads and lasses! If you've been following my blog, you'll know that in the past I haven't been that big on green. But I think it's time to admit that I have been converted! I have so many STUNNING greens that haven't seen enough love, and what better time to share them, than this month for St. Patrick's Day? I have compiled a list of 15 fabulous shades which are a mixture of mainstream and indie polishes. Some of these are just what you'd expect for the holiday, but I've included a few unexpected shades as well. Enjoy!


Wednesday, February 11, 2015

Fade Into You Valentine Gradient


In case you couldn't tell by my recent manis, or the calendar, Valentine's Day is almost here. Do you have any special plans? Dinner with your sweetheart? Partying with your girlfriends? Cuddling with your kitty? The hubby and I have plans to do something. We just haven't planned what that something is yet. We prefer to avoid the crowds and celebrate before or after the 14th. Something about mobs of hungry people just doesn't say "romance" to me. If you are braving the crowds and don't have dinner reservations, I have a helpful tip. After three+ years of working as a hostess I can tell you it doesn't hurt to attempt a little bribery. Or if you're not into that, you might want to bring some crackers to munch on while you wait two hours for your table.

Thursday, January 22, 2015

Sprinkles Water Marble


Hello lovelies! I recently posted this Confetti Water Marble mani and I loved it so much I decided to create a second one. I am even more in love with the results of my second version! The color combo makes me so happy. Something about the bright, fun colors make my mind think of a Fifties sock hop. Not sure why, but there you have it. It's a true party on my nails!

Tuesday, September 16, 2014

31DC2014 Day 15: Delicate Gold Lattice


I'm still a day behind on the challenge but I'm hoping to catch up soon! I knew this baby pink polish would be hard for me to photograph, but the pink and gold look soo purdy together. 

Friday, August 15, 2014

Southwestern Wedding Anniversary Nails


Last Saturday my husband and I celebrated our 11th wedding anniversary! Each year I give myself a nice pat on the back for making it this far. Yay for us!

Last year's anniversary nails were more soft and romantic. This year I went with colorful and graphic. Our wedding colors were blue and orange. It's one of my favorite combinations because I love blue, and I love bright colors!

Wednesday, August 6, 2014

Sinful Colors Curry Up


Hello beautiful people! Last month was pretty full of nail art, which I loved. It's about time though to pull some of my swatch posts out of my draft folder. So that's what I have for you today! I will be showing many more swatches this month. Don't worry though, there will still be a good balance of nail art posts.

Friday, July 18, 2014

OMD2 Challenge Day 18- Dotticure


Happy Friday everyone! How's your week been? Mine has been pretty darn great. My husband got a new job and we're both stoked about it. He should be much happier there. I've been having a great week here at Nail Polish Society too. I'm loving the guest posts (here and here) and I have another one for you tomorrow! Today I have a simple and sweet dotticure for the Oh Mon Dieu Challenge. I haven't been able to keep up with it every day because of my blogiversary celebration, but I'm joining in when I can. 

Wednesday, July 9, 2014

OMD2 Challenge- Day 9 Jelly


I was really looking forward to today's Challenge prompt! I just recently laid hands on the entire Sally Hansen Triple Shine Palm Beach Jellies collection. I kid you not, over the last couple of months I have searched for them in over a dozen stores. I finally found all but one at a Smith's grocery store (one I had previously searched). Then at Target yesterday I found they finally had a big display of them!

The biggest reason I've wanted them is so that I could try out the leadlight technique, applying them over a stamped pattern. Of course I could always make my own sheer polishes by just adding clear polish to a regular one and mixing them. But I didn't really want to go through that extra work. Plus I don't have any polishes quite this sheer, so naturally I needed them in my collection!

Monday, July 7, 2014

OMD2 Challenge Day 4- Bright


Happy Monday lovelies!
Well it's only a week into the Oh Mon Deux 2 Challenge, and I'm already a few days behind! I knew I wouldn't be able to do every single prompt, but I want to do as many as I can. So you might see me posting some a little out of order (notice yesterday was my Day 6 post, and today is my Day 4). I was so excited to do this BRIGHT water marble, and I just love how it turned out!

Monday, June 16, 2014

Scottish Festival and Highland Games


This weekend my family and I had a fun time at the annual Highland Games held here. The weather was perfect (it was strangely cold for the middle of June but eventually warmed up), so we were able to spend a few hours there. We listened to bagpipes, watched a dancing competition, my son battled a medieval knight, and did a little shopping too. Last year my husband picked up a kilt, a Douglas Clan tartan. This year we shopped to find a sporran to go with it.

Of course I had to have nails appropriate for the festival, so this is what I came up with.

Tuesday, May 20, 2014

Monochrome Sunbursts and Floral


Howdy everyone! How is life treating you this fine day? I am still trying to get over waking up from a cruel dream I had last night. I was dreaming that I was nail polish shopping, and there were rows and rows of Essie and OPI bottles on clearance. Just as I my basket was getting full of delicious goodies that I've wanted for so long, I woke up. Then came the sad moment of realization that it was all a dream. *sob*. Should I be admitting that I'm so obsessed that this is what my literal dreams are made of? Don't worry. The day I am visited by the Ghost of Nail Polish Past, Present, and Future, is the day I seek professional help.

Monday, May 5, 2014

Seaweed In a Blue Lagoon Gradient


Happy Monday everyone! I hope you're all having a great start to your week. I've been a little really stressed out about singing a solo this Thursday at a church event. I love singing, that's why I'm in the choir, but I'm no soloist. So why did I agree to this? I don't know. Because I love to do things that terrify me and make we want to puke just thinking about it? Hmm.. actually, I do. YOLO!


I've said this before, but thank goodness for nail polish to take my mind off of everything else! This color combo is especially bright and calming. It brings me to tropical islands and crystal clear waters. Places I've never been to, but I've seen pictures! Okay, I have been to Hawaii, but I don't remember the water looking like this.


After the gradient, I was originally just going to stamp the lighter color. My husband was watching me (creeper) and asked what I was planning on. I explained the plan and he suggested I stamp the royal blue over the lighter one. I tried it out on one finger and I loved it! Double gradient, whoa! Good job, babe. :)


What I used:
Sinful Colors Endless Blue- royal blue
Love, Charlotte XO by Color Club mint/turquoise shade
Cici and Sisi stamping plate 05
Seche Vite top coat

If you're feeling stressed out with finals, kids, work, performing things you have no business doing, you can put this mani as your computer wallpaper and stare into while listening to a sound machine with ocean waves. I bet that will help.

xx Emiline xx

Saturday, May 3, 2014

Garden Critters Skittle Nails


I've had this design in mind for weeks and finally had the courage to try it. I say that because I have never tried any of these designs before, and I get intimidated by trying something new. I have this bad habit of being afraid of failure. So I bit the bullet, spent a couple hours on it (or more), and here is the finished product. I am so happy to say that this mani came out just as I had envisioned it!


I had been thinking about the theme of Spring and that led to the idea of bugs. I thought it would be cool to do another macro design like the one I did for my black and white animal prints. I wanted to think of a fifth bug, but couldn't come up with one that would be easy to do or not totally creepy. So I went with a snail instead because they are kind of adorable.


Here's the long list of polishes I used. I used the same black on each nail, Sephora by OPI What's a Tire Jack?

Ladybug: OPI Red Hot Ayers Rock

Butterfly: Sephora by OPI Hi Def- orange, China Glaze Metro Pollen-tin- yellow/orange, China Glaze Lighthouse- yellow glass fleck, Sinful Colors Snow Me White

Caterpillar: Sinful Colors Snow Me White, Sephora by OPI Yellow My Name is Betsey

Beetle: Sephora by OPI S-age Is Just a Number

Snail: OPI Don't Preztel My Buttons- shell base color, OPI A-Piers To Be Tan- medium brown, mixed colors for snail body


What do you think? Would you try this mani yourself, or maybe just one of these designs on all of your nails? Would you like to see a tutorial?  I hope you enjoyed the post. Have a great weekend!

Please show some love and follow me on facebook, twitter, bloglovin', or pinterest! And thank you to all of my loyal readers. You guys are the bestest!!

xx Emiline xx


Friday, May 2, 2014

Get Out Your Sunglasses Water Marble


Yay! It's May! That means the temperatures are getting warmer, the days are getting longer, and I can spend more time outside. The weather was absolutely gorgeous yesterday and I was compelled to break out the neons. It's not summer yet, but being the 2nd of May in Utah, it will be here in a flash.


For this mani I started with a base of white polish so the neon would really pop. Then I prepped around the nails with Vaseline to make cleanup faster. I still don't know if I prefer this method, or just using tape. The Vaseline can be really messy, but the tape can ruin the polish if you don't take it off carefully enough. 

Then I commenced with the water marble using Forever 21 Neon Green, Finger Paints Pink Perspective, and Sinful Colors Coral Riff. For more information on how to water marble, check out my Distressed Water Marble Tutorial and just skip the distressing part.


I love water marble manis because once you've found polishes that will work, it's pretty quick. Even when you mess up the same nail twice (my ring finger couldn't get it together), it doesn't take that long. Especially compared to other nail art I've done. I'm looking at you spiraling dots! I think I got this done in about an hour. With more practice I'm sure I'll be even speedier.


What do you think? Do you like wearing a mani that refuses not to be noticed?


What I used:
Sephora by OPI White Hot- base color
Forever 21 Neon Green
Finger Paints Pink Perspective
Sinful Colors Coral Riff
Out The Door Northern Lights top coat


Bonus Cuteness Overload photo
I found these little cuties while I was outside taking my photos.


So when does summer officially start in your book? Once the weather reaches a certain temperature? Once your kids are out of school? When the calendar says it is? For me summer always arrives on Memorial Day Weekend, when my pool opens!


Wednesday, April 30, 2014

NOTD: Sinful Colors Coral Riff


My nail of the day is a recent purchase of mine. I made a trip last week to Ye Olde Drugstore in search of some newly released polishes, but sadly couldn't get my hands on them. I asked the salesclerk if she'd seen them in yet, and she led me around the beauty section trying to pretend she was helpful. Amateur. I had to walk away with something, so fortunately I laid my eyes on this pretty and took it home with me!

Coral Riff is a deep coral creme/jelly with multi-colored glass flecks. I used two coats here.

The glass fleck isn't in-your-face obvious, but I've always been a fan of a subtle shimmer.


Sinful Color polishes can be found at most drug stores. I purchased this at Rite Aid for $1.99.

Moral of the story: Even when you can't find the polish that brought you to the store in the first place, there is always a plethora of other options for you to buy! I want to know, how often does that happen to you?


Monday, April 21, 2014

My Favorite Polishes Right Now For Spring


Since starting Nail Polish Society, I've gravitated toward more opaque nail polish formulas. An opaque creme polish is usually quick to apply, and fantastic for nail art. Sadly, for that reason, many of my other polishes have been neglected in the past few months.
Although lately, I've been yearning for the light, fresh, shades of Spring. It's been nice to revisit some sheerer formulas, I didn't want them to feel forgotten! :)
I had so many pretties to choose from, it took some time to narrow down my choices so that this post wasn't a mile long. Here are five of the polishes that I'm enjoying this season.


Nail Tek Hydration Therapy Morning Dew is a lemongrass green with yellow-gold microshimmer. I don't think it could get any more "Spring" than this. I love how fresh and cheerful this shade is. I used two coats, and the formula was easy to work with.

This photo best shows how the microshimmer makes the polish glow.

I purchased Morning Dew at Marshall's for about $5 I think. It's the first Nail Tek polish I've bought, so I didn't even know where they were available ( their color ones). I'm still not really clear on that, but I'm so glad I randomly came across this one!


Ulta Salon Formula Peach Parfait is a subdued melon in a creme/jelly formula. I like how mellow and squishy this polish is. The formula is on the sheer side but still easy to work with. I used three coats.

I purchased this at Ulta for $2.00. The full retail price is $6.00, but they are frequently on sale.


Sinful Colors Cinderella is a medium toned baby blue in another creme/jelly base with pink and orange glass flecks. This is a cute and girly shade, and the name Cinderella is very fitting. The shimmer from the glass flecks isn't overwhelmingly obvious, but still visible and adds a nice dimension. It was a little more sheer than I had hoped, I needed three coats.

I purchased Cinderella at Kmart for $1.99. Sinful Colors are sold at most drugstores and mass retailers like Walmart, but I never see all the shades in one place. My local Kmart seemed to have the best selection available out of most the stores I've shopped at.


Sally Hansen Nailgrowth Miracle Loyal Lavender is a dusty lavender with prominent pink microshimmer. I LOVE this color. I am always on the lookout for a nice greyish purple, but one that is not too grey. This pink shimmer adds another interesting layer to this unique polish. The formula was more sheer than I hoped, but I still got a decent application with three coats.

I purchased Loyal Lavendar at Walgreens last Fall. It was on sale so I don't remember the price and I'm not sure if this shade is still available :(

Deborah Lippmann La Vie en Rose is a gorgeous white-ish pink, with pink and gold shimmer. The formula is very sheer, making the shimmer stand out from the base. This is a very work appropriate polish, but it's not at all boring! I used three coats here.

The shimmer is most visible in this photo, but it's still more obvious in person.

La Vie en Rose is now officially the most expensive nail polish I own. I purchased it at Nordstrom for $18. I really didn't want to spend that much, but after I swatched a little on my nail at the store, I couldn't stop thinking about it. It's limited edition and I just knew I'd regret it if I didn't have it.


What do you think of the shades? What polishes are you wearing that are Spring-worthy? Let me know in the comments!

Saturday, April 19, 2014

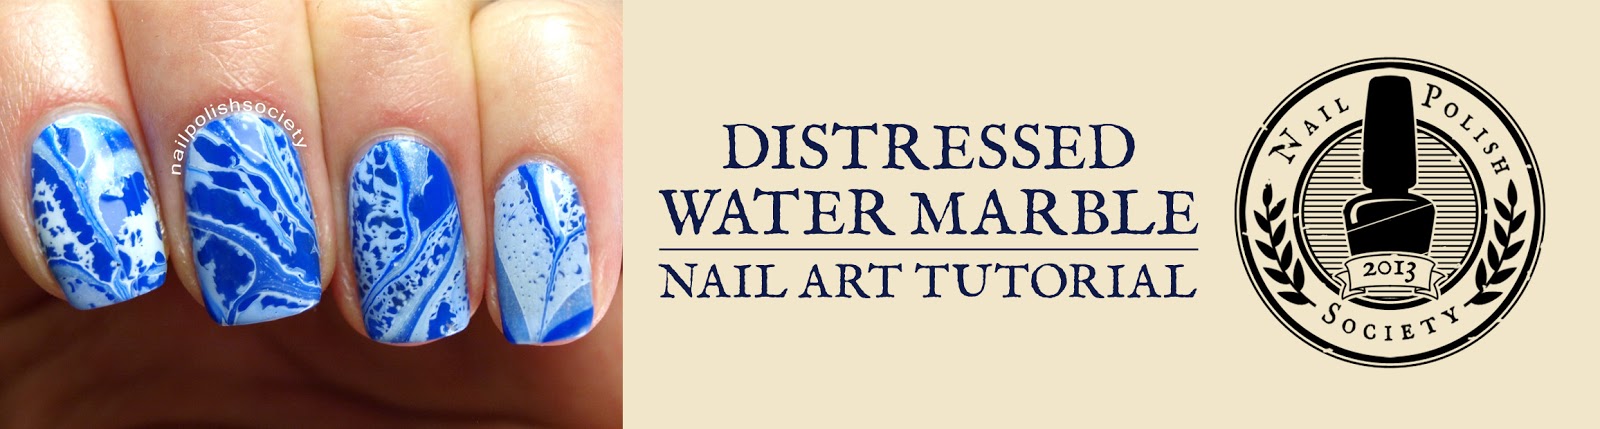
Tutorial: Distressed Water Marble


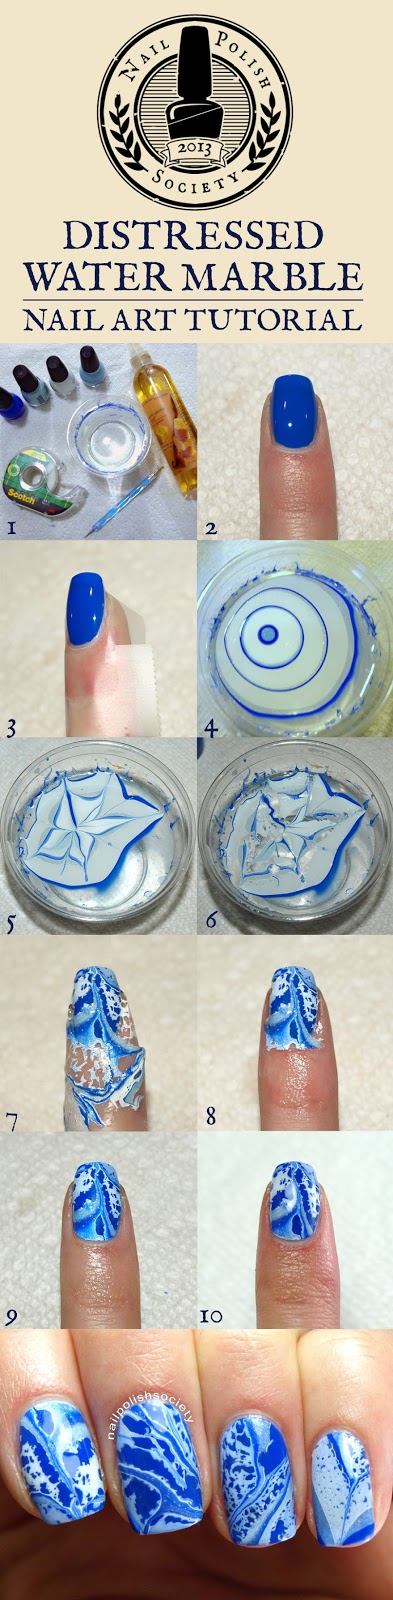
Hello all my wonderful Society ladies! I asked for some feedback on what you would like to see more of on Nail Polish Society, and the majority of you said you want more tutorials. So guess what.. I listened! I got a really good response when I debuted my amazing Distressed Water Marble nails recently, and wanted to share this technique with everyone. Now I have a tutorial so you can try it for yourselves!


What you'll need:

  • cup (not styrofoam!) full of filtered, room-temperature water
  • tape to prep skin for easy cleanup, or vaseline
  • perfume, body spray, hairspray- something with a pump spray and high alcohol content
  • toothpicks, orange stick, or dotting tool to create design in polish and cleanup
  • polishes that you've tested and know spread out well in the water

What to do:


  1. Get all your tools, and water ready. Have your polishes prepared with all the lids unscrewed. 
  2. Apply base color that will contrast against one or all shades in your water marble.
  3. Prep around nail by taping over the skin for easy cleanup. You could also use Vaseline on your skin to help the polish easily wipe off. It works really well, but I personally end up getting Vaseline all over my bottles, etc.
  4. Start your water marble by adding a drop of polish in the water. Do this close to the water surface. You can even touch it to the water if you struggle to get the drop off the brush. Don't drop it from too high or it will sink to the bottom. Repeat this process until multiple rings are formed.
  5. Create design by dragging an instrument through the polish. Do this quickly as the polish will start drying.
  6. Spray perfume/hairspray/alcohol at about a distance of four to six inches (10 to 15 centimeters). You can experiment with the distance to create different effects. After you spray the polish once or twice, give it a few seconds to break apart. 
  7. Choose a section of the design you like and place a nail over it, then dip it in. Keep your nail under the surface of the water until you have removed the excess polish off the surface of the water with instrument. You can do more than one nail at a time if there is more than one section you want to use, and if your fingers can reach it. Remove finger from the water.
  8. Carefully remove tape.
  9. Cleanup excess polish off skin and cuticle with q-tip and acetone, or for a more precise and lint-free solution, use a short and stiff bristled cleanup brush.
  10. Apply a generous amount of topcoat (I prefer fast-drying formulas) to avoid smearing the polish, as it will be delicate. Start with one big dollop and lightly spread it to cover the nail. Let it dry. You're finished! Sit back and enjoy your beautiful nails :)


Polishes I used:
Sinful Colors Endless Blue- royal blue
Sinful Colors Cinderella- light blue with pink microglitter
Sinful Colors Snow Me White- white
Seche Vite top coat


I would love to see your interpretation! If you try it, show off your creation on my facebook page, or by hashtagging #hellonailpolishsociety on twitter,

I hope this tutorial is helpful. Feel free to share it! Let me know in the comments what you think, and if you have any questions!