I know today's prompt for the 31 Day Challenge is "polka dots", but in the past I've just interpreted it as making a design any which way with dots. Because I do what I want. So that's what I've done again today. I actually did this exact mani a couple weeks ago but wasn't pleased with how it photographed so I didn't post it. Well here we go again, because I don't love these photos either. Getting metallic polishes to photograph well is a constant struggle of mine. I do like these nails so much though. I even wore them outside the house for other people to see, which is rare these days.
Showing posts with label blue. Show all posts
Monday, September 12, 2016
Monday, September 5, 2016
31DC2016 Day 5: Blue Mod
Howdy howdy! This holiday weekend has me a little behind on my goals of being ahead with the 31 Day Challenge. So I'm going to make this short and sweet. These nails were inspired by this mani by @rockyournails. She actually did four different variations and each one is awesome, but I stuck with just the one.
Saturday, April 16, 2016
Thursday, March 3, 2016
Blue Cirque Reciprocal Gradient
Hello everyone! Today I have some quick nail art for you. For this mani I had the idea in mind to do a vertical reciprocal gradient using X pattern stencils. I tried it on my other hand first and realized you couldn't really tell what was going on at all. So I tried a different approach, clipping off some of the Xs. I'm still not sure if it would have been better to remove some of the vinyl from the sides instead of the top. I guess I should have done more experimenting first. But the way that I went with made a big enough difference that I liked how it turned out. I hope you do too!
Tuesday, February 16, 2016
A England Order of the Garter Swatches and Nail Art
Tuesday, February 9, 2016
Moo Moo's Signatures Molly Moo and Snow Bunny Swatches
A few days ago I did this nail art mani and promised some swatches of the beautiful gray polish. And look at me! I'm actually fulfilling that promise. I also have a bonus swatch of another gorgeous Moo Moo polish. Lucky you!
Molly Moo is a gray holo with sterling silver flakies, gun metal flakies, silver ultra holo glitters, and subtle pink flakies. I am such a sucker for gray polishes, especially ones like these that are slightly more complex. Don't the flakies make it look like some sort of holographic granite? The formula was really great too. I used two coats, no top coat.
Monday, February 1, 2016
Stardust Polish February Releases
Hello ladies! Today I have four fabulous new Stardust Polishes to show you. There are a few fiercely girly shades, and whaddya know? They're all named after girls! I have lots to say about them so keep reading to find out more!
Thursday, January 28, 2016
Paint All The Nails Presents Pantone Color Of The Year
Hello lovelies! Today the ladies and I from Paint All The Nails are coming together once again for our monthly themed nail art linkup. Are you as excited as I am? Well let's get right to it! This month's theme is "Pantone Color Of The Year". This year there were actually two Pantone colors chosen. The colors are Rose Quartz and Serenity, otherwise know as pink and blue :P.
Monday, January 25, 2016
piCture pOlish Blue Skittlette
Happy Monday everyone! How was your weekend. I had a fun time with friends and family, it's a little sad that it's at an end. At least I'll have some keepsakes in the form of (what I know will be amazing) family photos taken by my very talented cousin.
Back to the blog- I am still computerless. I have high hopes this will be remedied soon. In the meantime I have these photos that have luckily for me been sitting in my draft folder. Typing this out on my phone is limiting so again I will be brief. Today's nail art is a simple look created with three piCture pOlish shades and nail vinyls. PiCture pOlish makes some amazing blues and I wanted to show some of them off together. This was originally a possible entry for last year's PP Nail Art Quarterly. With some help from a friend, I chose to enter this look instead. This mani has been sitting by the wayside ever since. I still like how it turned out though and hope you do too!
Saturday, November 21, 2015
piCture pOlish Whimsy
I have a quickie post for you today. Here is a swatch of piCture pOlish Whimsy that has been sitting in my files for months now. Time to break it out! One thing that I love about this polish is that it's totally wearable in every season! Don't you think it would look great with some Winter themed nail art?
Friday, November 13, 2015
Guest Post by Serenity Nails
Happy Friday! In my last post I mentioned that I would be featuring some upcoming guest posts. I am so happy to present my first from Christine of Serenity Nails! Christine is a talented blogger who I aspire to match in her photography skills and her writing (you should know by now- my least favorite part!). I'll let her introduce herself, and you can see what I mean:
Hi lovelies!
Hi lovelies!
I am so excited to be here on Emily’s blog today to share a little bit of something with you. But first, of course, let me introduce myself. I am Christine and I run a little blog out of Australia called Serenity Nails. Because I was completely unorganized I am sharing a simple swatch of a polish I picked up recently and some easy stamping I did with it. If you know me, you might know I’ve been on a little Emily de Molly kick lately. Emily de Molly is based out of Australia and produces stunning selections each month! First off I have swatches of the polish that stars in this mani. This is called The Glaring and was released back in September.
Saturday, February 28, 2015
Colores de Carol 50K Swatches and Review
Hey ladies! I have been patiently waiting all week to swatch this gorgeous polish. I've been willing my nails to grow faster after last week's nail break. This bottle has been sitting in front of my computer since I got it, staring me down. Finally I couldn't wait anymore and I'm so excited to share it with you!
Tuesday, December 2, 2014
Arcane Lacquer Respite Lane and Anti Gravity
Hello lovelies! My nails have been suffering this past month from the brutal dry climate. As a result I haven't been able to take any new photos because of my constant nail breaks. *sob* So thank goodness I have some swatches stored away!
I have two gorgeous polishes to show you today. Arcane Lacquer is an Australian based indie polish brand that I had my eye on for a while. In recent months I have acquired a small stash of them, all gorgeous and unique, including one from my most recent post. The two I have for you today are bold and beautiful, and have good formulas. With blue/teal shades, staining is always a concern. I only had them on long enough to swatch them, but in that time I didn't experience any staining. That is a major plus in my book! Let's take a closer look.
Friday, September 19, 2014
31DC2014 Day 18: Peekaboo Negative Space Half Moons
Friday, September 5, 2014
31DC2014 Day 05: Blue Blobbicure
Today I bring you a new technique for me, the blobbicure. I was inspired by @anya_sobko, one of my favorites on Instagram. She comes up with some really amazing manicures (and gorgeous photos of snails)! I was totally in love the first time I saw a blobbicure. I can't believe I took so long to try it.
Tuesday, August 12, 2014
Formula X Solar Flare and Photoelectric
Hello Lovelies! I have two gorgeous Formula X polishes to share with you today. A few months ago I showed you two from the Liquid Crystals collection in this post. I mentioned then that Solar Flare was next on my wishlist, and I finally got my paws on it! I had also been eyeing Photoelectric and had to add that to my cart. They are fairly expensive as nail polishes go, so I am slowly building my collection.
Formula:
The formula for both shades was great. They applied easily and evenly. They are described as sheer, and these two are. When I swatched Beacon and Magma I felt two coats gave sufficient coverage. I stuck with two coats for Solar Flare and Photoelectric too, but you can tell from the photos that I probably should have applied a third coat. It wasn't too obvious in real life though.
Cap and brush:
The Formula X bottles are topped with a bulky outer cap, but when removed it shows the smaller, easy-to-handle cap. The brushes are thin and flexible, and capture a balanced amount of polish on them for application.
Solar Flare is a "pink micro-glitter in sheer strawberry". I used two coats, plus topcoat. It's just as pretty as I hoped it would be!
Thursday, July 17, 2014
Renaissance Custom Lacquer Enamoured and L'Hiver Swatches and Review
Last month I swatched Renaissance Cosmetic's new Emerald Envy, and I promised you two more. I didn't plan on taking this long, but better late than never! The polishes I have today are truly stunning. I am in love! Just like Emerald Envy, both are very unique to my collection. Let's take a moment to gaze upon their beauty, shall we?
Enamoured is from Renaissance Cosmetics' new Wunderkammer Collection and is quite complex. It's described as "a deep purple creme/jelly with a vibrant fuchsia-gold shimmer, holographic micro-glitter, and blue iridescent flakes." Pretty amazing, right? What makes this so gorgeous is the rich vampy color, yet it's still vibrant at the same time. Even at night it glows and sparkles as you can see in this Instagram photo. Shown here is two semi-thick coats, plus topcoat. I found it a little easier to apply in thicker coats because of the texture of the flakies. It all smoothed out well with topcoat.
Tuesday, May 27, 2014
Poshinality Mysterious and Tomboy Swatches and Review
Poshinality is a new brand in the indie scene, based in Los Angeles. They had a big launch last month with a lot of bloggers participating. It was hard not to notice the swatches of Mystery on Nailz Craze (beware, Natalie's amazing photos will make you want to buy anything and everything she photographs) and I had to have it! So I checked out their site to see what else they have to offer. They have mostly traditional shades in a good mix of cremes, shimmers, glitters, and nail treatments.
I was also attracted to the ideas of what their brand is built on. Specifically, their "Philosophy", which is really inline with that of this blog, as stated in the Nail Polish Society Declaration. Their Philosophy is:
- Polish Is All About Personality.
- You have a right to feel comfortable in your own skin, personality and style of fashion. No matter how glamorous. No matter how simple.
- True beauty, confidence and self-worth come from within you.
- No one can be you but you so be you, do you, and love you unconditionally.
What more can I say? How about nothing, so we can get on to the photos!
Monday, May 5, 2014
Seaweed In a Blue Lagoon Gradient
Happy Monday everyone! I hope you're all having a great start to your week. I've been a little really stressed out about singing a solo this Thursday at a church event. I love singing, that's why I'm in the choir, but I'm no soloist. So why did I agree to this? I don't know. Because I love to do things that terrify me and make we want to puke just thinking about it? Hmm.. actually, I do. YOLO!
I've said this before, but thank goodness for nail polish to take my mind off of everything else! This color combo is especially bright and calming. It brings me to tropical islands and crystal clear waters. Places I've never been to, but I've seen pictures! Okay, I have been to Hawaii, but I don't remember the water looking like this.
After the gradient, I was originally just going to stamp the lighter color. My husband was watching me (creeper) and asked what I was planning on. I explained the plan and he suggested I stamp the royal blue over the lighter one. I tried it out on one finger and I loved it! Double gradient, whoa! Good job, babe. :)
What I used:
Sinful Colors Endless Blue- royal blue
Love, Charlotte XO by Color Club mint/turquoise shade
Cici and Sisi stamping plate 05
Seche Vite top coat
If you're feeling stressed out with finals, kids, work, performing things you have no business doing, you can put this mani as your computer wallpaper and stare into while listening to a sound machine with ocean waves. I bet that will help.
xx Emiline xx
Saturday, April 19, 2014
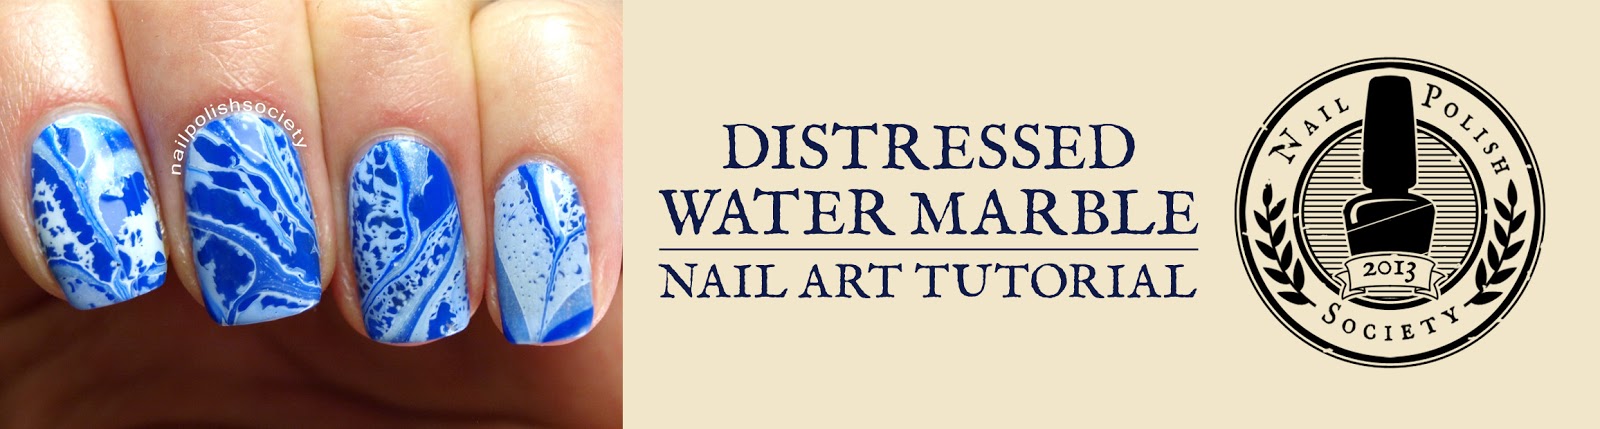
Tutorial: Distressed Water Marble
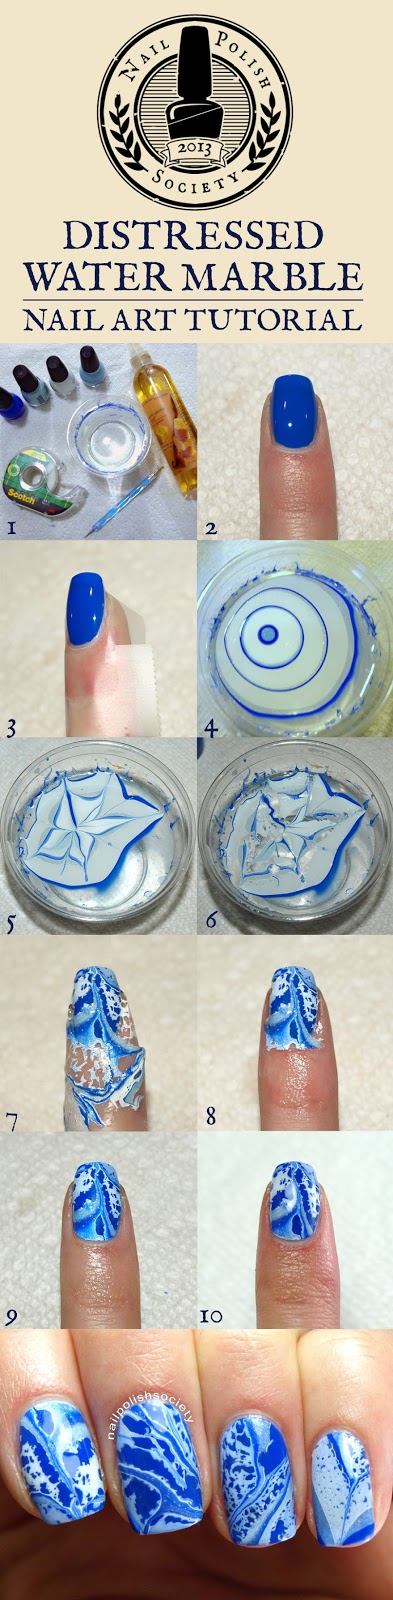
Hello all my wonderful Society ladies! I asked for some feedback on what you would like to see more of on Nail Polish Society, and the majority of you said you want more tutorials. So guess what.. I listened! I got a really good response when I debuted my amazing Distressed Water Marble nails recently, and wanted to share this technique with everyone. Now I have a tutorial so you can try it for yourselves!
What you'll need:
- cup (not styrofoam!) full of filtered, room-temperature water
- tape to prep skin for easy cleanup, or vaseline
- perfume, body spray, hairspray- something with a pump spray and high alcohol content
- toothpicks, orange stick, or dotting tool to create design in polish and cleanup
- polishes that you've tested and know spread out well in the water
What to do:
- Get all your tools, and water ready. Have your polishes prepared with all the lids unscrewed.
- Apply base color that will contrast against one or all shades in your water marble.
- Prep around nail by taping over the skin for easy cleanup. You could also use Vaseline on your skin to help the polish easily wipe off. It works really well, but I personally end up getting Vaseline all over my bottles, etc.
- Start your water marble by adding a drop of polish in the water. Do this close to the water surface. You can even touch it to the water if you struggle to get the drop off the brush. Don't drop it from too high or it will sink to the bottom. Repeat this process until multiple rings are formed.
- Create design by dragging an instrument through the polish. Do this quickly as the polish will start drying.
- Spray perfume/hairspray/alcohol at about a distance of four to six inches (10 to 15 centimeters). You can experiment with the distance to create different effects. After you spray the polish once or twice, give it a few seconds to break apart.
- Choose a section of the design you like and place a nail over it, then dip it in. Keep your nail under the surface of the water until you have removed the excess polish off the surface of the water with instrument. You can do more than one nail at a time if there is more than one section you want to use, and if your fingers can reach it. Remove finger from the water.
- Carefully remove tape.
- Cleanup excess polish off skin and cuticle with q-tip and acetone, or for a more precise and lint-free solution, use a short and stiff bristled cleanup brush.
- Apply a generous amount of topcoat (I prefer fast-drying formulas) to avoid smearing the polish, as it will be delicate. Start with one big dollop and lightly spread it to cover the nail. Let it dry. You're finished! Sit back and enjoy your beautiful nails :)
Polishes I used:
Sinful Colors Endless Blue- royal blue
Sinful Colors Cinderella- light blue with pink microglitter
Sinful Colors Snow Me White- white
Seche Vite top coat
I would love to see your interpretation! If you try it, show off your creation on my facebook page, or by hashtagging #hellonailpolishsociety on twitter,
I hope this tutorial is helpful. Feel free to share it! Let me know in the comments what you think, and if you have any questions!
Subscribe to:
Posts (Atom)