Friday, April 4, 2014

Ruffian With A England Ascalon and Barielle Soho at Night


I have a quick and dirty post for all you lovelies today. My "schedule"(I say that to give you the impression that I'm actually organized) has been a little off lately, so I grabbed some photos that have been hanging out in my draft folder. Enjoy!


What I used:
Barielle Soho at Night- deep plum creme
a england Ascalon- holographic steel gray and lavendar duochrome
Sally Hansen Dries Instantly top coat

I hope you're all having a fabulous Friday! Have a great weekend. :)

Wednesday, April 2, 2014

Puzzle Piece Nails Autism Awareness Day


I think puzzle piece nails look so cool, I'm glad finally tried them! As many of you know the puzzle piece is a symbol used by various autism organizations. Since today is Autism Awareness Day, I figured it was a perfect time for it. 


I always feel like my manicure was a success when my two-year-old recognizes the design without any assistance. :)


I always forget how bubbly my manis get when I use Sally Hansen Insta-Dri. I would be annoyed, but it's really not noticeable in person.


What I used:
Barielle Banana Drop- yellow
Sally Hansen Insta-Dri Brisk Blue- medium blue
Sally Hansen Insta-Dri Blue-Away- baby blue
Sephora by OPI What's a Tire Jack?- black

What do you think? Have you tried this look before?

Saturday, March 29, 2014

Distressed Water Marble

Hey everyone! For today's mani I had this BRILLIANT idea of combining water marbling with one of my favorite nail art techniques, water spotting! Let me introduce you to.. distressed water marbling! Maybe someone had already already done this? If so, I've never come across it. Don't ruin it for me, let me think I invented this okay?


To start, I applied my base color, two coats of OPI My Vampire is Buff. Then I picked a ton of colors I thought would look together. I tested them all in the water to see which ones would spread out well.

I eventually narrowed it down to five polishes and started my water marble. I made as many rings of polish in my plastic cup as would spread out, then with my toothpick I dragged through the rings making little swirly designs.

Next I used some perfume (to make use of the high alcohol content and pump spray nozzle) and sprayed directly on the polish. This created the spotted/distressed look. I dipped my finger in a part of the design that I liked, and then before pulling it out, cleaned up the excess polish off the surface of the water with a toothpick. There weren't very many usable areas, so I ended up going through the whole process for each nail. Yeah, I know. It took forever. Totally worth it though.

It might be useful to mention that I had prepped around the nail with Scotch tape to make cleanup easier. I finished it all off with a coat of Out The Door Northern Lights top coat!


My thumb came out so awesome! It looks just like what I had in mind.


It's been quite awhile since I last used Out The Door Northern Lights, and I don't know why it has been so long! It is so beautiful with the tiny holographic sparkles. 


What I used:
OPI My Vampire is Buff
OPI Every Month is Octoberfest
Essie Lilacism
OPI Dutch You Just Love OPI?
China Glaze In a Lily Bit
Sephora by OPI Iris I Was Thinner
Out The Door Northern Lights top coat

So what do you think? I am pretty happy with the results! Is this something you would try? If you do, I'd love to see it!

Thursday, March 27, 2014

China Glaze Spring 2014 City Flourish (a few) Swatches and Review

I was so ready start wearing brighter, softer colors now that Spring is here. Aren't you? So when I walked into Sally Beauty (as I often do) and saw China Glaze on sale with buy one get one free, I picked up four of the polishes from their Spring 2014 City Flourish collection. Knowing I shouldn't buy ALL of them, I grabbed four shades that would help me fill in some gaps in my collection.

If you've read any reviews about this collection you'll probably have heard about the issues many have had with the formula. I have to say I am one of the people that struggled with the application. I typically expect to have more difficulty if the polish is really light or pastel. For me, all the effort is worth it if it's a shade you really like and don't already have one like it. On the other hand, if you have a polish that is close enough and has a good formula, I would say you could pass on most of these.


At Vase Value is a bright pastel mint blue creme. I used three coats, plus top coat. My camera didn't like this color, so unfortunately it doesn't show it very accurately. :( It blew out all the color and made it look really white, but it has more depth than this. I do really like the color but the formula is chalky, dries matte, and takes some finesse. 


In a Lily Bit is a pastel lilac creme. I used three coats, plus top coat. The formula was basically the same as above. Still a lovely color that I'm glad I have.


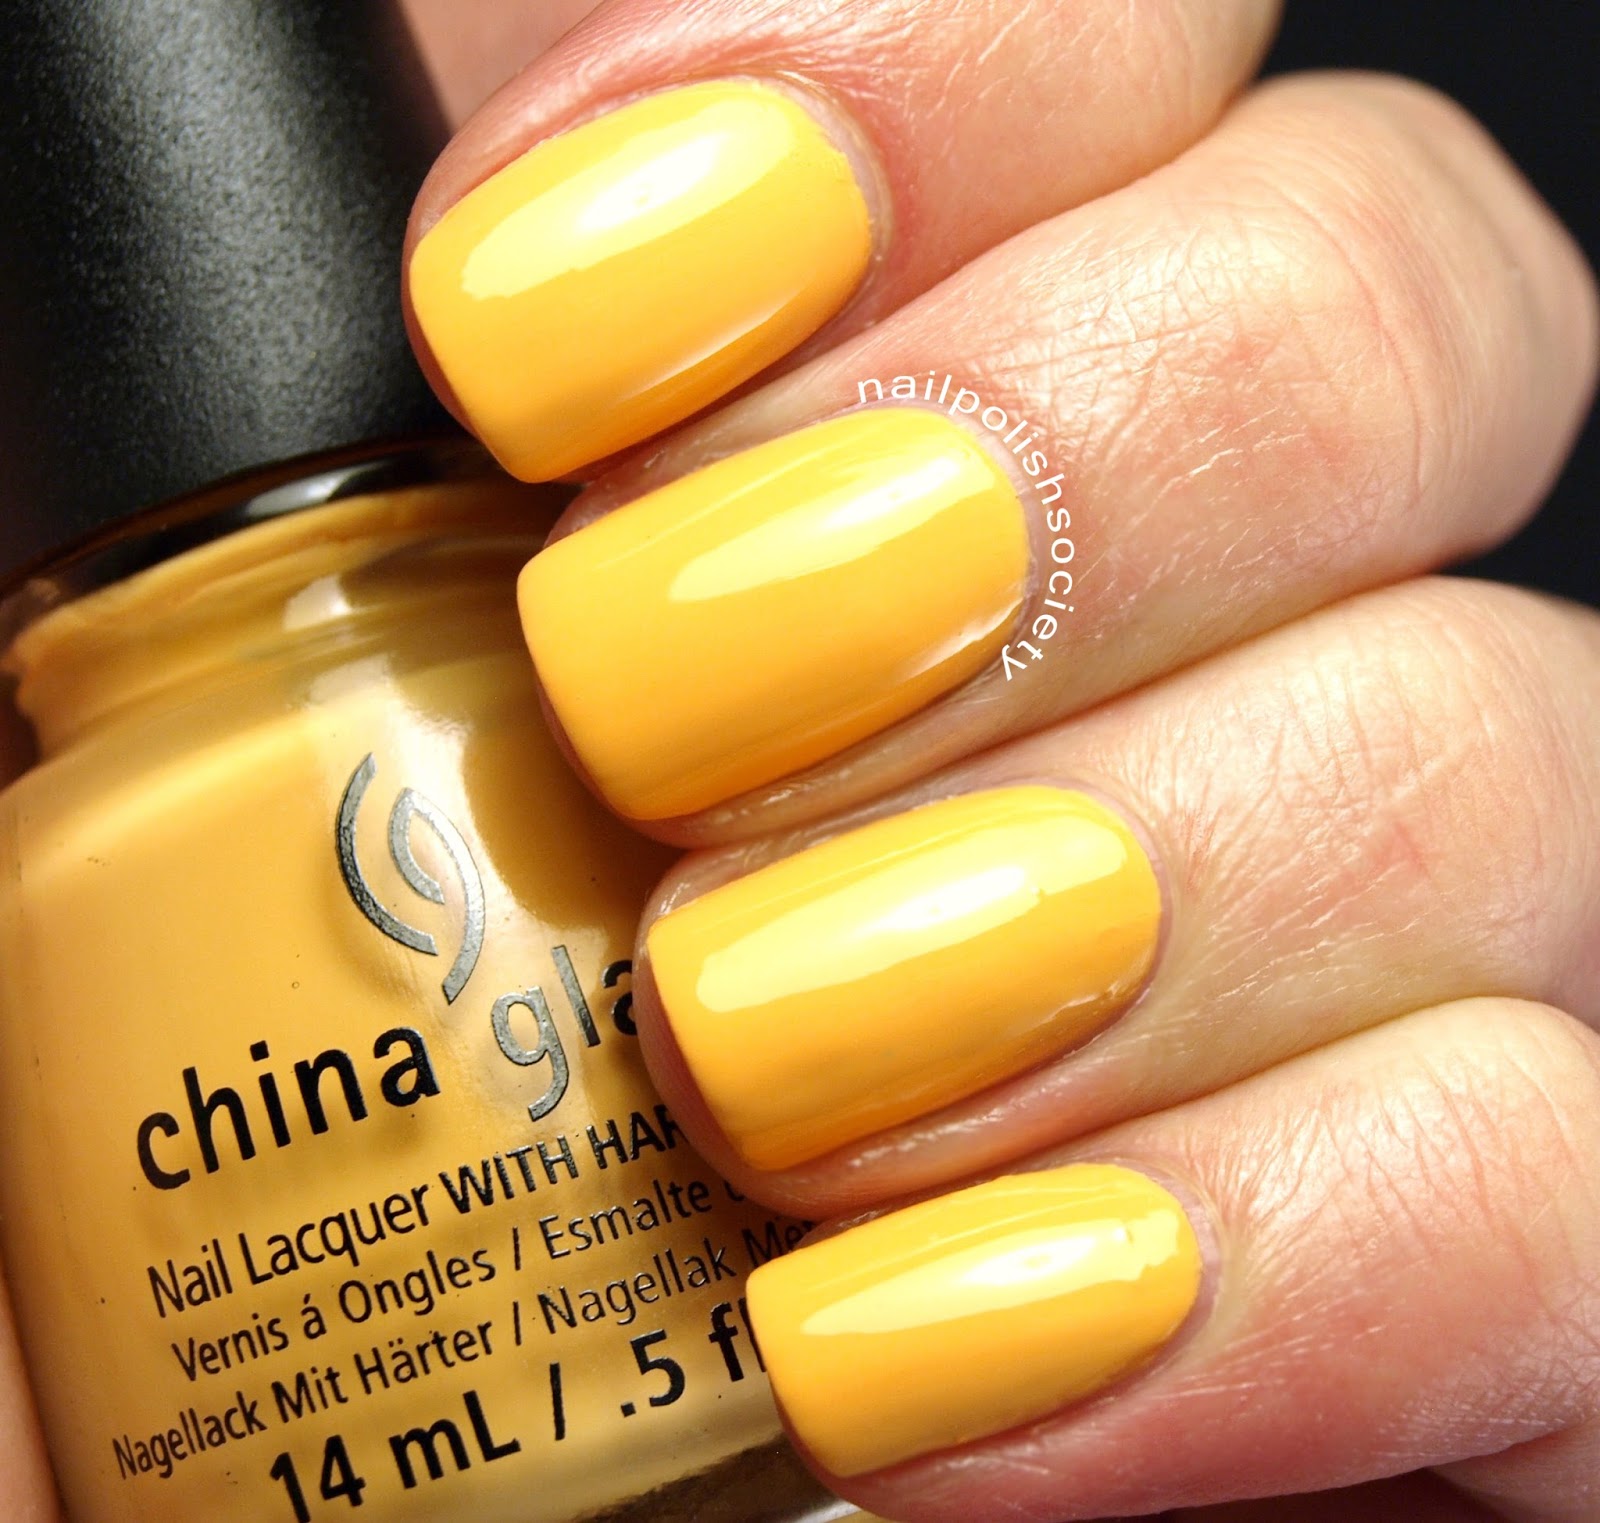
Metro Pollen-tin is a orangey yellow creme. I used three coats, plus top coat. This was the most difficult formula out of the four to work with. I had to be so careful in my application and even then found flaws that were a little bothersome.


Don't Honk Your Thorn is a nude with a subtle silver microshimmer. I used two coats, plus top coat. This formula is different from the other three because of the shimmer, and much easier to work with. I am a fan of nude polishes and feel this is a good addition for me.


Something I found that helped with the application was not to mess with it too much. I tried to apply each coat with as few brush strokes as possible and that seems to make a difference.

Again, the pretty shades paired with the discount price made my purchases worth it. Maybe if I had paid full price I'd feel a little differently. What do you think of the collection? Did you get any or all of them?

Monday, March 24, 2014

Glitter Tropical Fruit Smoothie


Happy Monday everyone! How is the start of your week going? The sun is shining bright here, and that always puts me in a good mood!
This weekend I did a gradient with the two colors that I swatched in my Clinique Bonus post. I knew I wanted to do something else with it but couldn't make up my mind. I enlisted some help from ya'll on facebook where it was suggested to do glitter tips. So thank you Shawna! You can't really go wrong with glitter, can you? And thank you Melanie for the idea for the title. You guys are the best! :)


When I do a manicure, I always do my right hand first. I practice my technique and design ideas on that hand so I can fine tune everything before I do my left hand (the one I photograph). My left hand usually looks much better as a result. For some reason though, my right hand ended up looking much better. My gradient looked much more "gradient" like, with the colors blending together more smoothly. How annoying.
In those cases I still photograph my left hand for a few reasons. First, it's just awkward trying to handle my camera in my non-dominant hand. Second, I don't take as good of care of my right hand so my cuticles and nail shape are always a little wonky. What can I say? I'm lazy. Lastly, even though the gradient looked better, I still wanted to use that as my test hand for how I wanted the glitter to look.


What I used:
Clinique Hi Sweetie- hot pink
Clinique Really Rio- coral
Nicole by OPI Stars at Night- bar holo glitter
piCture pOlish Glitter Ball- round holo glitter

Thanks for stopping by! If you don't follow my blog yet, there are a plethora of ways you can! Find me on facebook, twitter, pinterest, bloglovin', google+ (follow by email and Google Friend Connect on the sidesbars). I love to get feedback and ideas from everyone. It really makes my day :). Ya'll come back now!

Thursday, March 20, 2014

Spring Is Sprung

Hello lovelies! How are you enjoying your Spring so far? Today is a perfectly sunny day and I'm enjoying it while I can, because who know what next week will bring. Already down the street our neighbor's cherry tree is blooming. Each year it's the first to serve as evidence of the changing season. Now I am looking forward to more flowers blossoming, warmer weather, and longer days.

I am celebrating the start of Spring with some colorful floral nails. For the mani I used four China Glaze polishes from their new Spring 2014 City Flourish collection. I plan to swatch these shades and have them posted next week. For now, let's look at the photos!


I love how simple and easy florals are. You can be as abstract as you want and it still comes out pretty. I had planned to do more of a watercolor look for the flowers, but didn't realize how much it would blend in with the tan base color. I found this out by testing it on my right hand first, then decided to switch it up for my left hand. I am going to try a watercolor mani again soon and hope it comes out how I envision it.


What I used:
At Vase Value- bright pastel mint blue
Don't Honk Your Thorn- nude with silver microshimmer
In a Lily Bit- lilac
Metro Pollen-tin- orangey yellow
Seche Vite top coat


I hope you're having a great beginning to your Spring (or Fall for all you Southies)! Will you be sporting any floral nails?
Don't forget to come back and check out my full swatches of these four shades.

Tuesday, March 18, 2014

Clinique Spring 2014 BONUS at Dillard's Nail Polish Swatches

Really Rio and Hi Sweetie

*Disclaimer: I am employed by Clinique, but these are my own opinions. All product was purchased by me.*

It's Clinique Bonus time at Dillard's (for another week, or until supplies last) and because it includes nail polish, two choices even, I had to get both options! Of course, since the polish is a mini size, it's only worth qualifying for the gift if you actually are going to use the products you're buying. Since my skincare is almost exclusively Clinique, it's usually worth it for me.

Clinique A Different Nail Enamel For Sensitive Skins polishes were released June 2013. I am so glad Clinique finally came out with a quality polish! The formula they had a few years ago was in my opinion, low quality. The new formula has many benefits. They have been specially formulated and allergy tested to be gentle and non-irritating to the skin and eyes. Most important to me is how opaque most of them are even in one coat. All the ones I've tried have a lot of shine to them too. So now for the swatches! 

Hi Sweetie is a hot pink creme. This is two coats, plus top coat.


Really Rio is a muted coral creme. This is two coats, plus top coat.


Bonus also includes-

  • cosmetics bag
  • Take The Day Off eye makeup remover- really good for waterproof eye and lip makeup. For all skin types.
  • Dramatically Different Moisturizing Lotion + - the famous yellow lotion got an upgrade last year, now with 50% more hydration (hence the "+"). For dry to dry/combination skins
  • Lash Doubling mascara- black, thickening mascara, that has a tapered brush
  • A Different Lipstick in Raspberry Glace (shown below) or Sugared Grapefruit- a lipstick that's more sheer than creamy. Both shades have a gold shimmer in them. Full size.
  • Even Better Makeup SPF 15 foundation- For all skin types, though not recommended for very oily skin. Provides moderate coverage with a natural finish. There are four shade options for the gift, Ivory, Neutral, Beige, and Amber. (I am very fair, so there wasn't a matching shade available for the gift. This is actually the foundation formula I use, but I wear the lightest shade, Linen.)
  • A Different Nail Enamel For Sensitive Skin and Eyes in Hi Sweetie or Really Rio- Both are permanent shades. .14 oz/4 ml


Raspberry Glace and Sugared Grapefruit

If this Bonus is a must have for you, make sure to get it while it's still available. Let me know if you have any questions about this post. Tell me if you want to see more like it in the future. I hope you enjoyed it!