Pages

Wednesday, October 30, 2013

Tutorial: Candy Corn Nail Art

On Nail Polish Society's facebook page I promised I would work on bringing you all some tutorials soon. I had a really positive response to my Children of the Candy Corn Nails post the other day. I figured this manicure would be a good place to start. So here it is, my first tutorial!


What you'll need:

  • inexpensive makeup sponge
  • Elmer's glue or Scotch tape
  • white, orange, and yellow polish (the more opaque the better)
  • optional- small nail art or cosmetics brush for cleanup 


  1. After applying a base coat, apply two coats of white polish.
  2. Cover the skin around your nail with Elmer's glue and let dry completely. I store my glue in an old polish bottle that I emptied out completely in the trash can, and rinsed thoroughly with acetone. You could also mask off the skin with Scotch tape instead.
  3. Paint each polish color onto the makeup sponge, enough that it's well saturated.
  4. Dab the sponge a couple of times on each nail. Reapply the polish to the sponge as needed. Repeat this step until you've reach the desired opacity.
  5. Remove the dried glue, or tape.
  6. Clean up around the cuticle with a small nail art or cosmetics brush dipped in acetone. My favorite is an e.l.f. concealer brush I purchased from Target for $1.
  7. Apply top coat. A fast-drying brand such as Seche Vite speeds things up.
  8. Now you could leave it as is. Or for a little more pizzazz, you can add some glittery polish on top. Or stamp a design on top. Endless possibilities! 


Let me know if you try this for yourself! I would love to see it!

Tuesday, October 29, 2013

Gilded Bumble Bee

This is an old post from back in August. I was trying to edit a typo and accidentally put the post back in draft form. I couldn't figure out how to put it back to where it was originally publish. Arrrggh!! So instead of having it just disappear, I'm republishing it. If anyone knows how to restore it, please let me know!


I have been blogging for over three weeks now. Why am I not perfect yet??!! What is this learning curve, and why is it harassing me? Seriously, I am an impatient person. I get frustrated when things don't turn out the way I want them to, even if I have almost no experience under my belt. This is why it took me years and years to finally learn how to cook. Every couple of years I would try something ambitious like lasagna,  and then throw my hands up in despair when it didn't turn out right. It might sound silly, but it's sadly true.

I've been clinging to my mantra now, "Don't give up! Don't give up!", because I so badly want to stick with this and improve. So I had a cool (says me) idea and it didn't turn out. Well good. Now I've learned even more than if it had gone perfectly smoothly.


I used blue painters tape to mask of the gold base and painted black over it. I can't cut it straight lines well, so it was hard to get the pieces even. I guess I didn't have the tape very secure against the nail because once I pulled them off, the lines looked all wonky. Some of the gold also came off with the tape, which was pretty frustrating.

What I used:
Ulta 14 Carat- gold base
Sephora by OPI Looks Like Rain, Dear- gold glitter
Sephora by OPI What's a Tire Jack?- black


I am pleased with the title though. Gilded Bumble Bee sounds either like the name for a trendy "chic boutique", or some Renaissance restaurant/inn.


Also, I felt like a gangsta with all the bling on my nails.

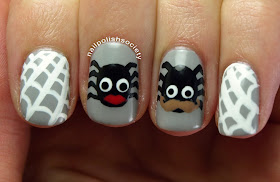
Mr. and Mrs. Q.T. Spider

I'm trying to squeeze in some more Halloween nail art before the holiday is past. This fun little mani was inspired by my three-year-old son. A couple weeks ago we were making Halloween decorations out of construction paper. As I was putting together a girly spider (I didn't want it to be scary), he put in a request for a boy spider. I was stumped as to how to make one look like a boy, when he suggested it be anatomically correct. I was too busy busting a gut, that I never came up with a more appropriate solution, and it never got made. After hearing the story, my Aunt was the one who pointed out the obvious- just add a mustache! Duh.


I hate spiders as I'm sure most of you do. If you like them, more power to you. But I think there's a little room in my heart for Mr. and Mrs. Spider.


I made the spiders' bodies, lips, and mustache using my large striping brush. I made the legs with my It's So Easy Stripe Rite polish. I used the same polish in white for the spider webs. The eyes were made using two different sizes of dotting tools.


Aren't they so cute? My son approves, but also thinks Mr. Spider looks like the Lorax.


What I used:
Zoya Dove- gray
Sephora by OPI What's a Tire Jack?- black
Sephora by OPI White Hot- white for the eyes
OPI Red Hot Ayers Rock- red
Zoya Flynn- brown
It's So Easy Stripe Rite in white
It's So Easy Stripe Rite in black

Are you tired of Halloween manicures yet? I know I'm not. I have so many ideas that I haven't had time to do. They will just have to sit and wait until next year. I'm really hoping I can get at least one more done!

Monday, October 28, 2013

Nail Polish Society's First Giveaway!

*Edit: This giveaway is now closed.*


The time is finally here for my first giveaway! The Nail Polish Society facebook page has reached 100 likes, and to celebrate I put together an awesome prize! Here are some closer looks at the prize:

Sephora by OPI mini set
I Think I Cayenne, Have You Met Rose, Mary?, Justa' Pinch of Glitter, S-age Is Just a Number

Bobbi Brown Extreme Party Mascara, Clinique Long Last Glosswear in Bonfire,
Clinique set of mini emery boards, cosmetics bag

Three 15 ml Sephora by OPI
Already Famous, I Found a Pot of Gold!, Just a Little Dangerous

Five rolls of striping tape, tweezers

I really wanted to put together a prize that I would want to win! I wish I could give something to each of you as thanks for all the support. Help spread the word, and don't forget to enter to win!

Giveaway Details:

  • Starts: Now
  • Ends: November 19 at 12:00am EST
  • Open Internationally
  • Must be at least 18 years old, or with parent's permission
  • How to Enter: Earn entries through the Rafflecopter widget. Required entries are email, and Nail Polish Society facebook fans. All other entries are optional. You can tweet about the giveaway once every day for extra entries (make sure to paste the URL in the Rafflecopter widget each time).
  • Selecting a Winner: On November 19th, or shortly after, I'll notify the winner (chosen by Rafflecopter) via email. Please remember to add nailpolishsociety@gmail.com to your contacts so it doesn't get lost in your SPAM folder. The winner will have 48 hours to respond or a new winner will be chosen. I will announce who the winner is once chosen. Good luck!


a Rafflecopter giveaway

Saturday, October 26, 2013

Children of the Candy Corn Nails

Today I am bringing you more Halloween nails. Yay! (Or boo, because it fits. Haha.) As I mentioned in my Fiery Halloween Nails post, it is my favorite holiday. So it's very possible you will see some more spook-tacular manicures next week! I am keeping this post short and sweet because I am working on a tutorial for it! 


This glitter topper is PERFECT for Halloween. I can't believe I didn't realize that when I bought it. The big hexagon glitters are gold, the smaller ones are black, and the smallest glitters are a coppery orange.  Love it.


 In case you were wondering, the title is a reference from "Wreck it Ralph". My kids love that movie.


What I used:
Sephora by OPI White Hot- white
Sephora by OPI Hi Def- orange
Jenna Hipp Tweet Me- yellow
Sephora by OPI Come to Pappa-razzi!- glitter


Mmm, anyone hungry for some candy corn? It was one of my favorite candies when I was little. I also have a bonus recipe for you that I got from my sister-in-law.


Candy Corn Mix
1 part candy corn
1 part salted peanuts
Eat together, and it tastes like a Nut Roll!

Soo yummy. Let me know if you try it! Even I couldn't mess up that "recipe". Oh wait, yes I could.


Wednesday, October 23, 2013

Formula X for Sephora Legend Swatch

Hello All! Today I want to show you the new Formula X for Sephora Legend. It has been a long time since I've only had one nail polish in a post! Not since last month in my Most Used Polish post. It is certainly a far cry from wearing 18 polish in one manicure! So I can't help but feel that I'm cheating a little here. To make up for it, I have lots of pictures!


My mom very generously brought this back from NYC for me. Thanks mom!


Formula X for Sephora is a new brand that launched this fall and can be found at, um, Sephora. This polish is from the brand's "Shifters" category. Sephora describes the category as "a two-toned metallic lacquer that shimmers with a kaleidoscopic effect."
I like that it is the "crushed microsparkles" that have the color shift, and the base metallic color essentially stays the same.

Legend is described as "maroon and rainbow metallic". I don't know about the maroon part. I feel that in all different lights it appears more of a plum.


This is two coats, but it was almost opaque in one coat. The application was nice and smooth. This is with top coat. Without it, it's not very shiny.


 Direct sunlight:

Out of focus to show off the rainbow sparkle:


 A bonus artsy photo of the bottle:


  • Formula X for Sephora is available at Sephora stores and Sephora.com
  • This polish is a three-free formula
  • Retail price $12.50


What do you think? Are you going to be checking out any of the new Formula X polishes?

Tuesday, October 22, 2013

It's About Time! Fiery Halloween Nails

I can't believe it's taken me so long do some Halloween nail art. It's already the 22nd! It's especially surprising because Halloween is my favorite holiday. Are you all so excited it's just over a week away!? I can't wait to embrace my inner child and rock my costume!


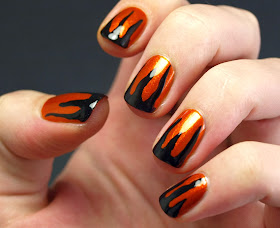
Today's design isn't anything specific. It's kind of whatever you want it to be. I think the black looks like drips, but also like flames. Dripping flames?


If it looks a little familiar, I also used these polishes in my tiger stripe nails.


This is how the manicure started off:

I used Scotch tape to get the crisp lines for the black tips. You can see I was a little impatient and used the tape before the polish was dry enough (Let that be a lesson to you all!). I had different plans for the design, but after I started, it didn't look good, and I had to just wing it. I love how it ended up! If I were to do it again, I would  just free hand the whole thing.

What I used:
Sephora by OPI I Think I Cayenne
Sephora by OPI What's A Tire Jack?


Do you still dress up for Halloween? Or do you dress up your kids? Maybe your pets? Or are you those people who turn off  all their lights, but forgot to close the blinds, and it's obvious to all the trick-or-treaters that you're home watching t.v. but won't answer the door? I know you're not those people. ;)

Saturday, October 19, 2013

33 Day Challenge Day 12: A Pattern in Your Home

For today's mani I emulated probably the one and only good design in my home. It comes from my Nautica comforter that I have loved since the moment I saw it. The design is simple. It's just colored stripes of varying widths down the middle, with the sides being solid almost-black-blue. It's so colorful, and yet it's not overpowering.


I love bright colors! They make me happy.


I was so pleased how well I matched most of these colors. A few of my polishes were really spot on. For the others I had to mix polishes together. The one polish here that is off is my navy one. It should be a lot darker, but I decided to just keep that one as it.


I started with the navy on my pinky and applied it straight from the bottle. I did the same with the nude next to it. After that I used my long striping brush to apply all the rest of the colors, moving in the same direction towards my thumb. Many of the colors only need on coat which was fortunate. It's a bit of a challenge mixing together colors a second time for another coat, trying to get it the same.

I mixed the polishes together on a paper plate that I've used for a couple other manicures. Apparently the plate was messier than I thought because I ended up with some debris in the polish. Oops. But if you squint you can't even see it!


What I used:
I mixed a few of the colors, so I won't list those. The polishes that are unadulterated are:
OPI Dating a Royal- navy blue
Barry M Lychee- nude
Sephora by OPI Havana Dreams- baby blue
Sephora by OPI It's Totally Karma- lime green
Sephora by OPI Too Too Turq- turquoise
Seche Vite top coat


Now I just need to work on making the rest of my home this pretty. It is far from it. Maybe I should buy less polish and save for a couch?

Wednesday, October 16, 2013

33 Day Challenge Day 11: 3D

Today was another fun opportunity for me to try something new.  A few days ago I was browsing Nailscope and knew I had found what I wanted to do for today's prompt. I took my inspiration from Elina's 3D nails post. And by inspiration I mean I did pretty much exactly what she did. Why mess with it if it works? Okay, I didn't want it to look exactly the same, so I did a gray-scale interpretation.


Elina's was smoother along the curves, and I would like to know how she achieved that. Mine looks a little more rugged. I think it still works either way.


I started with my darkest gray and applied one thick coat all over the nail. I tried as best as I could to keep it slightly thinner in the middle though. I knew it would be covered up and didn't want the layers so thick that it would never dry. I continued with the next lighter gray and so on until I painted the white on. I tried to keep the white at one thick coat, but had to go over and touch up a couple nails with another thin coat.

Then a finished with some sparkle, my favorite part of this look. I added something a little different with the holo hex glitter polish on my accent nail. I tried to load up the brush with glitter, with as little of the clear part of the polish as possible, with both of these glitter polishes. Some of the big glitters I had to apply with a small nail art brush because I couldn't get them to spread on the nail with the bottle brush. It was slightly frustrating, but I made it work in the end!


Do these nails remind you of anything? I kept having this feeling that they looked familiar. It took quite some time, but I think I figured out what it is. There is a life size Lego sculpture of a polar bear at our zoo. Naturally, it's white. But there are gray tones too where the shadows are. The polar bear doesn't have any glitter though.


What I used:
(from dark to light)
Sephora by OPI Break a Leg Warmer
Sephora by OPI Frankly I Don't Give A-dam
China Glaze Pelican Gray
Sephora by OPI White Hot
Sephora by OPI Meet Me at the Disco- small holo glitter
Sephora by OPI Beam Me Up Hottie!- big hexagonal holo glitter
Seche Vite top coat

photo source: http://www.hoglezoo.org/coh
On a final note, this mani dried just fine with the Seche Vite. Yay!

Tuesday, October 15, 2013

33 Day Challenge 10: Flowers

I didn't have much of a plan for today's design. I kind of wanted to see what I could come up in the process, by painting random shapes to see what it would turn into. I came up with a color palette, which I'm really pleased with, and would love to use again in another mani. I wanted my flowers to have an Autumn feel to them so I went with more muted shades. Similar to yesterday's post, I like the subdued feel here.


I started with three coats of OPI No Bees Please. I have always been in love with this color. It's so wearable, subtle, and squishy. Perfect for when I used to have to worry about work appropriate nails. I just realized I also used this polish in my African Violets mani. Apparently it goes really well with flowers! I am halfway through my bottle (that is rare for me!), which makes me sad.


I did all of the shapes with my dotting tools. I think I used three different sizes. I started with one big flower on each nail. I really liked how it looked at that stage, but I wanted to continue to experiment. So I just added a bunch of randomness all over.


I guess this is what you'd call a "skittle" mani, with something different on each nail.


What I used:
OPI No Bees Please- sheer cream/nude with pink microshimmer
OPI Nantucket Mist- dusty rose with touch of coral
Sephora by OPI Give Peace a Chance- yellowy peach
Sephora by OPI Tweet You Later- light pink mauve
Zoya Bevin- sage green
Zoya Caitlin- purple gray
Jenna Hipp Hashtag- peach

What do you think? Which season do you think this represents the best?