Pages

Saturday, August 31, 2013

31 Day Challenge!

I've been looking forward to doing a challenge since I started this blog. I am already feeling the anxiety and hope I'm not totally frazzled by the end. Just being able to keep on schedule and finish it will be a big accomplishment!
I will be participating in a 31 day challenge which is starting September 1st. I won't be posting on Sundays, so I will just try to catch up on Monday with a double post. The challenge is open to whoever wants to participate. Each day there is a new prompt, and you create a manicure according to your interpretation of it. There is a lot of room for creativity, which should produce lots of awesomeness.
If you're inspired to try all or just part of the challenge, I would love to see your photos! Feel free to post them on my facebook page, please :).
Sarah from Chalkboard Nails made this image for the challenge which she is graciously sharing. Go check out her post for this, or another version.


Let's do this!

Thursday, August 29, 2013

Tutti Fruitti Polka Dots

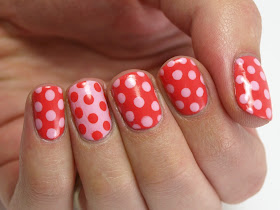
This is the first full-out manicure utilizing my dotting tools. They arrived in the mail from Amazon a few weeks ago, and I have been intending to do one of these ever since. In all honesty, I waited this long to do one because I don't like dots as much as I do other designs. It was good though to try it and see if I could do it. More practice will do me good. Anyhow, I think the colors are really cute together.


Compared to my right hand, this one turned out much better. I did the dots on my ring finger last, but forgot that when I put my top coat on. I was going to wait a few more minutes so that it wouldn't smudge. The second I put the brush to my nail I realized my mistake, but there was no going back. I know, the drama I face with nail polish. I bear it all so well. Fortunately, it wasn't that disastrous. 


I think this is the only thing I own with polka dots.


What I used:
Jenna Hipp Damage Control- pink
Sephora by OPI I'm Wired- coral
Out the Door top coat

Do you own anything with polka dots? What do you think the pattern looks best on?

Thanks for reading! Smiley face! Hearts!

Wednesday, August 28, 2013

Eye Shadow Pigment Nails


Thank you Lacquerheads of Oz for this inspiration! I stumbled upon their pigment nails tutorial, and realized that I had actually tried a version of this before.
Years ago my coworker and I were strolling through the mall, possibly on our break but more likely we were "shopping on the clock". I know, I was such a rebel. We were checking out some eye shadows at a NS Minerals kiosk, not seriously intent on buying anything. That changed when the sales girl told us you could use the shadow to make your own nail polish. Oooooo, now that caught my attention. Suddenly I was looking at the colors in a whole new way. Lacking any actual instruction, I tried to apply the nail polish with just a clear coat, and it looked awful. There just wasn't enough color. That was probably over six years ago and I hadn't tried it again until now. I don't even like to use these as shadows. It's a good thing I have such an aversion to throwing anything away!


I started with a base color of Sephora by OPI Havana Dreams. I wanted to show it here so you could see the difference between the polish and the loose eye shadow pigments I used over it.


After three coats (I probably could have just done two), I applied my Out the Door top coat. While it was still wet I used my eye shadow brush to tap some of the medium blue over the nail. I let it dry, brushed off the excess, and repeated the process again with the white/blue color. I repeated the process for a third time with a little of the dark black/green color.

Unfortunately none of these eye shadows came with labels so I can't tell you what they're called! They were sold in stack-able sets of three. 
I am so happy that I found how to make this technique work. This was loads of fun for me to do, because seriously it's so easy! Now, after all these years, the once "useless" eye shadows are no longer collecting dust.

You all should try this! Even if you don't like the look, do it just for the fun of it. Let me know if you do, I want to see pictures!


Tuesday, August 27, 2013

Silvery Swoopy Stamping

First things first, you will notice my nails are decidedly shorter here. I have always had super thin nails, so growing them out that long has been quite an accomplishment for me. They were splitting badly and it was time to start fresh. I've been trying my bestest to care for them, and I'm still hoping they'll eventually get a little bit stronger.

Here is my first ever attempt with nail art stamping. If you have seen or done stamping before, don't judge me! If you have no experience with it, doesn't this look awesome?!


 View from a distance.


Close up.

You will notice, especially on my thumb, that the stamp design was too small for my nails. Apparently these fit other people, but mine are too gigantic? I know I'm not the only one that has this problem, so it's confusing why they're not all made bigger. The plate I bought is from Born Pretty and it was only $3, so I thought I'd give it a whirl. (The stamper and scraper together were $2)

Besides the design not being big enough, I think the grooves were also too shallow? It's hard to tell. Maybe it was just me, because some seemed to stamp better than others. There are varying qualities of stamping plates out there from what I've read, but I don't really know where these land in the spectrum.


I followed Sarah's stamping tutorial from Chalkboard Nails. It was really straightforward and easy to follow. Basically you just paint the polish in the design on the plate, scrape off the excess, stamp the plate, then stamp onto your nail!


Despite some of the issue I had here, it was SUPER fun! I am really looking forward to finding some better quality plates, and hopefully ones that fit!

What I used:
a england Sleeping Palace- purple base color (GORGEOUS color, I will have to give you a better look soon)
Sephora by OPI Queen of Everything- silver design
Out The Door Northern Lights Hologram (Silver) top coat
New Curve Design Nail Art Stamp Template M69

Friday, August 23, 2013

OPI Tropical Punch Ombre


I had so much fun with my Bikini So Teeny Ombre that I just had to do another. I asked for feedback on what my next one should look like, and it was suggested that I try coral this time. I went with OPI Tropical Punch, the shade shown on my middle nail. Once again, I love this look! I made this ombre a little more dramatic than my last by adding more white for the lighter nails and more black for the darker ones. I also thought this would have a nice summer look, but I feel it looks more Autumn-y. That's okay too because I am so over 100 degree temperatures.


I really like the shades on my thumb and index finger.


I used the same process as last time. One thing that was still a challenge was making sure I had enough of each color. With just small amounts of colors mixed together, they dry out pretty quickly. I needed two coats on each nail. So I got one color mixed, paint one coat on the same nail on both hands, and then quickly paint the second coat. There were a couple nails that got really gloppy with the polish drying up, but luckily this polish self-levels really well. Top coat (I used Seche Vite) also does wonders! The lesson here is that I should probably be mixing a larger amount together, but I just hate to waste what I don't use.

Do you have a preference between the two I've done? I really love them both, but this one maybe wins by an inch for me. Let me know if you have any questions!


Thursday, August 22, 2013

Sally Hansen Insta-Dri Color Blocking

Thank goodness for nail polish, because I do not do color blocking with my wardrobe. I think it looks great on other people, but I personally don't feel comfortable in that much color. Good thing my nails have more confidence!
I spent some time arguing with myself, trying to decide which colors to use (I won in the end). Maybe I have too many colors to choose from? Here's the combination I decided on. 


What I used:
Sally Hansen Insta-Dri Brisk Blue, Peachy Breeze, and Pronto Purple.

This is the first time I've used Sally Hansen Insta-Dri polishes. My initial idea was to have a third block of color on each nail, but I ran out of time. They don't dry as "insta"ntly as I had hoped. Part of that is because the peach and blue went on a little thick. Sometimes thick is necessary to get the opacity that you need, but the peach needed extra help to cover the darker colors. That made the polish turn into bubble city, but thankfully you can't tell in the photos! I found the brushes challenging to work with too. So I wouldn't reach for these polishes for a simple manicure, but I can see their usefulness for future nail art.

How do you feel about color blocking your outfit? Is it a go-to look for you, or just for when you're feeling extra bold?


Wednesday, August 21, 2013

Jenna Hipp What's Hot Now Collection Swatches and Review

I heart Costco. I really do. I even read "The Costco Connection", a magazine that features articles about people who have their weddings at Costco. Well at least they met at Costco, went on dates there, and bought the wedding dress, cake, flowers, and honeymoon from there. I may not be quite that big of a fanatic, but I sure get excited when they sell nail polish!
So I have a bunch (12!) of swatches and reviews from the Jenna Hipp What's Hot Now Collection. It features 12 minis with four pastels, four jewel tones and four "glitz & glam". Are you ready for a really long post?
Let get straight to polish, shall we?


                                   Pastels: Tweet Me, Hashtag, Damage Control, Freshmaker

Tweet Me- banana creme, 3 coats, went on very streaky but finished well.

Hashtag- soft peach creme, 3 coats, was streaky but finished well.

Damage Control- pastel pink creme, 3 coats, also streaky but finished well.

Freshmaker- mint creme, 3 coats, not as streaky as the previous three but still needed that third coat.

Jewel Tones: Private Getaway, Room Service, Look Hot Feel Cool, I Can Afford It

Private Getaway- red coral creme/jelly, 3 coats, very smooth application.

Room Service- raspberry red creme/jelly, 2 coats, very smooth application (the easiest of the bunch).

Look Hot Feel Cool-  green/teal shimmer, 2 coats, smooth application. This photo looks dark, but I feel it best represents how the polish looked on my nails.

With flash to show blue shimmer.

I Can Afford It- dark purple with blue shimmer, 2 coats, decent application. I had the same issue here getting the color to look true, but I think this is pretty close.

With flash to show blue shimmer.


Glitz & Glam: Hollywood Reporter, After Party, Awards Season, Editor's Pick

Hollywood Reporter (shown with Freshmaker)- hex and round holographic glitter, 1-2 coats, this took some effort to work with. I had to dig around in the bottle a little to get enough glitter on the brush.

After Party (shown with Damage Control)- hex and round rose glitter, 1-2 coats, same issue here with getting glitter on the brush. I forgot top coat here (oops), so it looks a little messy.

Awards Season- soft gold metallic, 2 coats, easy application but with visible brush strokes. 

Editor's Pick- black olive with gold, red, and green shimmer, 2 coats, good application. What a coincidence, this is my pick too!

So I really debated whether I wanted to swatch this collection, but in the end I wanted you all to see it. It took me way too long to finish them all. I'm such a slacker. You may also notice my thumbnail got busted after I started. Even in my struggles with the photos, I think it's still an improvement from my last swatches. 

More thoughts on the product: 
I really do like each color in the collection, with Editor's Pick being my favorite. The formula for the pastel colors were the hardest to work with, as they usually are. Private Getaway and Room Service do look really similar both in my photos and in person. Awards Season was fairly streaky, as metallics often are, but I liked how soft of a gold it was. Lastly, I love how the bottles fit together!

Ever since the collection was released I have seen it "sold out" on Costco.com, but I found a ton at my local warehouse. The best part? It was only $14.99!


What do you think of the collection?


Monday, August 19, 2013

Retro Airline Stewardess

It was time for me to break out my striping tape again! I think the design with these colors resulted in a retro look, something associated with an airline. I can just picture a stewardess with her hair full of Aqua Net, wearing a scarf with this pattern.


I started with my thumb and loved how it turned out, but I still wanted a little variety. My husband suggested I change up the direction on each nail. I think it gives it a little more visual interest. It all went fairly swimmingly, until I applied the top coat. Then it streaked a little where some of the polish went on too thick. It was pretty hard getting the right amount of polish into those small spaces. I think next time I try something like this I will apply it with a nail art brush.


I think my thumb turned out the best. 


 As I was photographing this and feeling like I want to fly somewhere, I realized the photos needed some wings. This pin was my Grampie's who was a Major in the US Air Force. He served two tours in Vietnam, and a number of other conflicts. It was fun to work on this and think of him. Maybe I should do something Air Force themed in the future!


What I used:
Essie Bikini So Teeny- light blue
OPI Dating A Royal- navy blue
OPI Miami Beet- maroon

Does this make you want to fly somewhere?